
Tip of the Week: The Windows 10 Touch Keyboard Offers Considerable Utility
Digital communication has changed a lot over the years. Nowadays, special characters are commonplace for the modern person to communicate with. The special characters that are most frequently used are called emojis. They have become a staple in mobile communications, even among professionals. After all, who hasn’t responded to a message with an emoji thumbs up or a smiley face?
There are more special characters too, such as currency symbols, fractions, and more that enhance people’s ability to communicate. The problem is, that these symbols and emoticons aren’t located on the traditional keyboard. So Microsoft has added some pretty dynamic functionality into their Windows 10 operating system’s touch keyboard.
Windows 10 – Touch Keyboard
Before those of you using Windows 10 computers on a traditional PC with no touch capability get confused, these tips can absolutely be taken advantage up through use of the traditional mouse. If that is the case, you will need to access the onscreen keyboard on your Windows 10 device. The process for this is outline here:
- Right click a blank spot on your taskbar.

- Click Show Touch keyboard button.
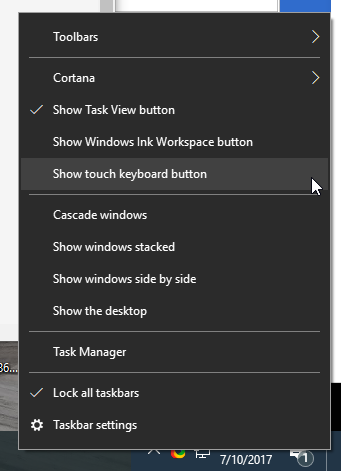
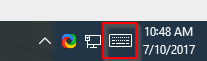
- Touch keyboard icon will appear to the left of the time clock on your taskbar.
Primary Touchpad Keyboard
So when you are looking to add special characters, simply click on the touch keyboard icon and a keyboard that looks something like this will appear: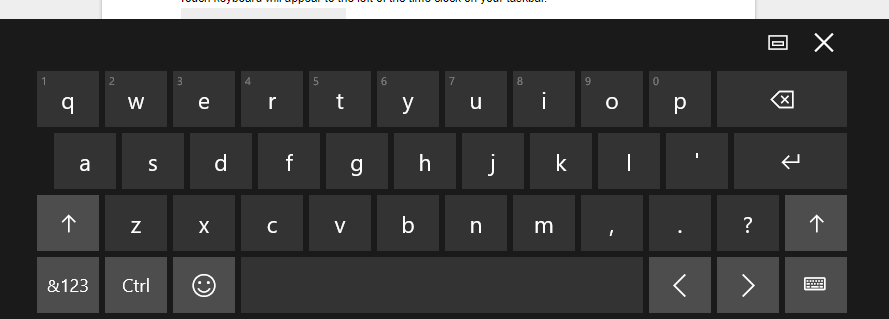
Related Characters
Outside of your standard keys, you have quick access to so much more. If you’re looking for a character that is related to one that is on the traditional keyboard, clicking and holding will bring up a menu of similar letters. For example, some Spanish conversations might require the letter: ñ. To find this, simply click the letter ‘n’ and hold it, as depicted below: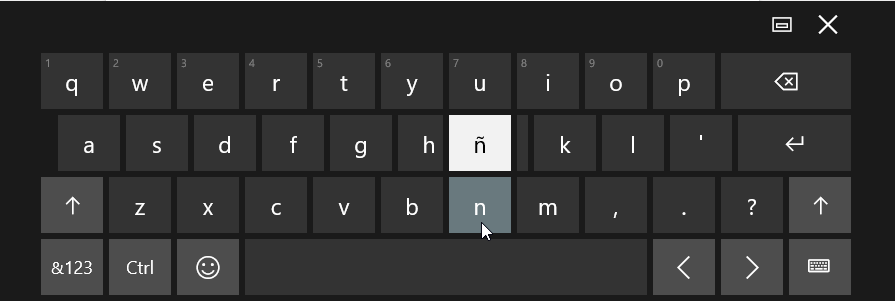
Punctuation and Numerals
For more characters, click on the &123 button on the bottom-left part of the keyboard. You can see this highlighted below. Once you press that, you can long-press and receive more options.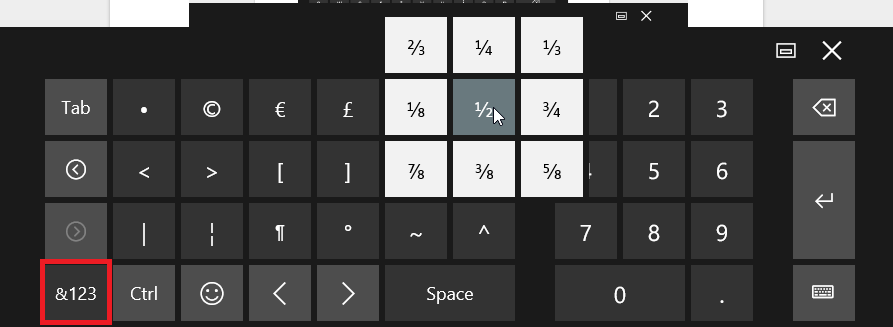
Emojis
Clicking on the happy face emoji will light your keyboard up with faces and other emoticons.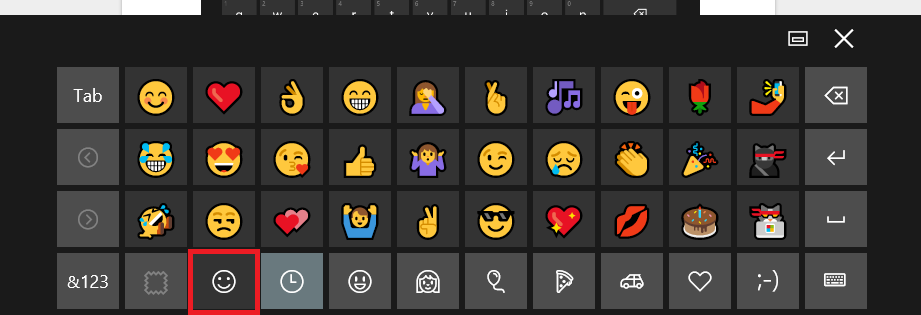
For the modern user, being able to creatively communicate is important. With Windows 10’s on-screen keyboard integration, it is now easier than ever to say exactly what you want to say. For more great tips and tricks, subscribe to our blog today!
Tip of the Week: How to Clear Browser Cache in Chrome, Firefox, and Edge

Is your web browser running as well as it should be? Sometimes you might experience situations where your browser freezes or crashes. If your web browser starts acting up, you can troubleshoot what’s wrong by trying to clear the cache.
What is the Cache?
The cache is what stores data as you go about your business on the Internet. The cache doesn’t normally affect performance. After all, cookies and other such data don’t cause any notable issues. Your web browser’s cache generally consists of files from websites that you often visit so that your computer can load them faster. Visiting a website once will download all of the pictures and other graphical interfaces so that the next time you load the page, it won’t have to redownload them. Depending on the specifications of your computer, your cache might eventually accumulate enough data to affect its performance. If you’re having trouble with the cache, you might experience pages freezing, unfinished loading, and applications failing to respond.
Clearing Your Browser’s Cache
To solve these issues, you can clear your browser’s cache. This is sort of like hitting the reset button on your browser. We’ll list out how you accomplish this in the various web browsers that are at your disposal.
Google Chrome
In the browser toolbar, you’ll notice the three-dot icon. Click it and select More tools > Clear browsing data. Next, select the boxes for Cookies and other site and plugin data, as well as Cached images and files. You can then use the dropdown menu under Obliterate the following items from: to select the amount of data you’d like to delete. Once you’ve done so, click on Clear browsing data.
Mozilla Firefox
In the Firefox toolbar, select the three-bar icon and navigate through History. Next, select Clear Recent History. This brings up a new Clear Recent History window. From the dropdown menu, next to Time range to clear, select Everything. Under Details, check the box next to Cache, and click Clear Now. Once you’ve exited out of the browser, reopen Firefox.
Microsoft Edge
At the top-right corner of the screen, select the Hub icon, which is the three-horizontal lines. Click the History > Clear all history. Next, select Cached data and files. Once you’ve done this, click Clear. After you see the All Clear! message, close out Edge and reopen it.
Now that your cache is cleared, see if the browser’s activity has returned to normal. Some of your regularly-visited websites may take longer to load initially. This actually isn’t a problem–it’s just your browser trying to fill in some of the cache data that you just deleted. Once you’ve loaded the site a few more times, you’ll see its performance is much-improved.
If you’re still experiencing problems with your browser, perhaps the problem lies elsewhere. Unfortunately, it can be a bit tricky to nail down the cause without the assistance of a trained IT professional. If your organization is suffering from technical issues, reach out to Catalyst Technology Group at (317) 705-0333.
Tip of the Week: How To Be Better At Time Management

It would be hard to find someone who has never experienced the feeling of a time crunch, a situation where someone has more to do than they had hours to do it in. This feeling can be reduced by enhancing productivity through better time management. For our tip this week, let’s discuss some methods to improve time management within your office.
Simplify and Streamline
Before you devote your time to completing a particular task, it helps to determine whether or not that task needs to be completed now or if it can wait until later. Focusing on what needs to be done sooner allows you to better plan to fulfill these responsibilities.
In this way, it helps to follow whatever schedule you have in place, committing your full attention to accomplishing what is outlined for you to do. By eliminating distractions around you and focusing on the task at hand, you will be able to complete your duties more quickly and with greater accuracy.
Furthermore, is the current process to complete a given task as efficiently as possible, or are there redundancies and other unnecessary elements involved? Eliminating these elements will only allow you to cut out extra time that could be better spent elsewhere.
Planning for Success
Of course, the key to time management is establishing how much time you have to manage. It helps to put together a schedule to follow that firmly sets important events, such as project deadlines or meetings. This will tell you how much time you have to devote to your other tasks. Once this time has been established, turn a critical gaze toward the rest of your schedule.
Establish which of your remaining tasks need to take priority over the others, and incorporate them into your schedule accordingly. It is also important that you take your coworkers’ schedules into account. If they need you to complete some task before they can carry on with their work, plan to complete that task sooner, rather than later.
Creating a schedule for yourself to follow throughout the workweek is a solid way to not only ensure that your tasks are attended to, but that you can accomplish them at your peak. For instance, if you know you have a meeting on a Thursday and a deadline to meet on Friday, you can ensure that you give yourself ample time in the beginning of the week to prepare for both. You also need to be sure that your high-priority tasks are given a high enough priority to ensure that they are finished on time.
Preventing Resources From Causing Issues
Communication can be a double-edged sword in any office environment. While it is a necessary tool to remain productive, it can quickly cause harm if misused. For example, cell phones. While they are an excellent tool for communicating, they can only serve a limited use in the professional environment–even as a component of a Bring Your Own Device productivity strategy–and can therefore become a distraction above anything else, wasting precious time.
Yet not every issue with your company’s time management are caused by a human habit. Oftentimes, mismanaged IT can lead to serious issues that will prevent the company’s employees from properly doing their jobs and thereby from being productive.
All’s not lost, however, as Catalyst Technology Group can provide the tools to ensure that your IT is in top shape, freeing you to focus on spending time on improving the other components of your business. Give us a call at (317) 705-0333 for more information.
Tip of the Week: Google Drive Is Even Handier With These 3 Tips

Google Drive is certainly a worthy cloud solution, and if you have the good fortune of using it for your organization, you know that it can offer everything from word processing to file storage options. However, there are always hidden features that can help you improve the way you use Google Drive. We’ll walk about three of the lesser known ways to use Drive that can help you better use it for your organization’s benefit.
Use Quick Access
Quick Access is a feature that lets you open your recent files without sifting through your Drive needlessly. You’ll have thumbnails of your most recently opened files on the top of your Drive’s home screen. If you want to turn on Quick Access, check Google Drive’s settings. Click the Gear Icon and select Settings. You need to select Make relevant files handy when you need them. Then all it takes is a page refresh and voila, Quick Access is turned on.
Take Advantage of the Search Function
There is a down-arrow at the top of your Drive’s screen which you can use to search for specific files. You can even filter the search results according to various fields, which include the type of field, the owner, where it’s located, and the date it was last modified, among many others. Proper use of the search function will help you find files more efficiently so that you can stay as productive as possible.
Remove Your Photos for Recent View
Many users take advantage of Google Photos to backup the photos on their mobile devices, but this can make it a little tricky to navigate your Google Drive. When you use Photos in this fashion, your Recent view will be so cluttered that it seems to become impossible to find what you are looking for. To remove your photos from Recent view, just use the Search function to filter out all .jpg or .png files in your Drive. This can work for both your web browser and your Google Drive app.
These tips can help you accomplish more in your workday and better use Google Drive to its full potential. For more great tips and tricks, subscribe to our blog and reach out to us at (317) 705-0333.
Tip of the Week: A URL Can Help Give Away A Phishing Attack
Back in 1995, scammers pulled the first phishing attack. They took the identity of AOL employees and requested the billing information of users through instant messaging. More sophisticated phishing attempts have evolved over the years, culminating in the commonly-seen email phishing attack, which tricks users into handing over personal or sensitive information. Phishing attacks can be seen through, so we’ll show you how you can identify threats before they become a problem.
How Phishing Emails Work
Above everything else, a phishing email needs to be convincing it if wants to trick anyone into opening it. For example, if you received an email from the bank filled to the brim with misspellings and blocked images, would you trust them? Phishing attempts have become more elaborate and more difficult to identify, as hackers understand that detail is important to trick users. Still, if you look closely, you’ll be able to identify a real message from a fake message designed to steal your information. In particular, you can check a URL for legitimacy.
The Tricks of Malicious URLs
Phishing attacks will typically require that the user clicks on a URL found in the phony email. They will then be redirected to a website that asks for their credentials. Most users who don’t know better will click on the link and not think twice about where it leads. Hackers understand this and try to distract them from caring by using strong language, urging them to take immediate action. This is how deceptive URLs try to succeed, but there is one fatal flaw in this tactic.
Avoiding Phishing Attempts
Phishing emails show all sorts of warning signs that you can identify if you’re observant. First, take note of any links that are in the message. Do NOT click them without first checking if they are legitimate. Hover over the link and see where it goes. Again, be extra careful to only hover over it and not click it. You should see where the URL goes, and if it’s not to the domain that it claims to be from, just avoid it. For example, if an email claims to be from paypal and wants you to click a link, the link should go to paypal.com–not payypal.com. Such an event could very well be a scam that wants to steal your username and password.
In other words, it’s a matter of common sense. Does the link look like it makes sense in the context of the sender?
If the answer is no, you’re probably staring at a phishing email. Don’t click the link, as it could perform any number of functions, from taking you to a malicious website or instigating a download of malicious files. Regardless, the end result will surely be detrimental to your organization and its network security.
Catalyst Technology Group can keep your network from suffering these types of breaches. To learn more about how we can keep phishing messages out of your inbox and monitor your network in real time for data breaches. To learn more, reach out to us at (317) 705-0333.
Tip of the Week: How to Encrypt Files on Your Windows PC

Encryption is one of the most effective ways to secure a file, and even the average user can take full advantage of it on their Windows PC. In essence, you can arrange for your files to appear as random numbers, letters, and special characters in the event that an unauthorized user accesses them.You might be surprised to learn that even your Windows PC has encryption options so that you can protect your sensitive information if so desired.
Once you’ve encrypted a file, don’t think that it’s encrypted for good. You’ll have access to a decryption key, which is used to read the file again after the encryption process. Think of it as the picture on the box that lets you put a jigsaw puzzle back together after it’s been ripped apart and scattered on the floor.
Encryption has been all over the news lately, as ransomware attacks like WannaCry have become a blight for users everywhere. Hackers use ransomware to encrypt files against the user’s will, and they hold the decryption key hostage in an attempt to extort a ransom from the user. While the method of use is quite different for ransomware, it does show how good encryption can be for keeping unwanted users from accessing sensitive information.
NOTE: Before breaking down the steps to encrypting a file, we want to make it clear that data security and encryption is not for everyone to use without discrimination. The majority of users will want to entrust their data and its integrity to an IT Professional, like those at Catalyst Technology Group. IT Techs will determine which data should be encrypted, evaluate that it is done properly and ensure that the correct parties are able to access the data while keeping threats out. It’s extremely important that you don’t encrypt data in a shared environment. If you encrypt shared data, users that would normally have access to the data, won’t. In cases like this, it’s better to let a software solution implemented by IT do the heavy lifting for your company’s standardized file encryption.
To encrypt a file or folder in Windows, locate the data that you want to encrypt. Next, follow these steps.
Select the file or folder, right-click it, and go to Properties.
Next, a new window will open. Select the General tab and click the Advanced button.
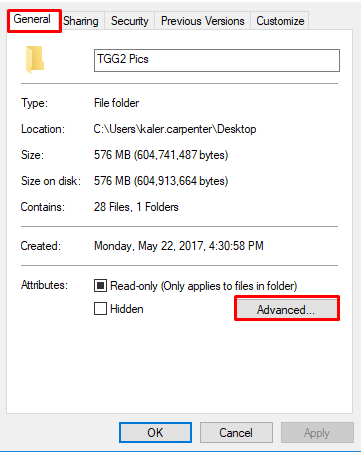
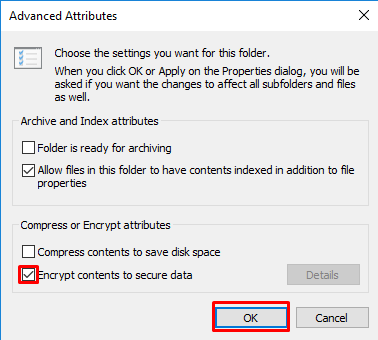
Check the box that says Encrypt contents to secure data. With this box selected, you should next click Apply and OK.
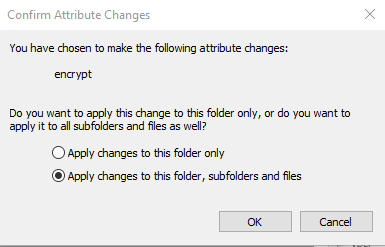
Depending on whether you want to encrypt a single file or a folder, you’ll see a new window that asks you to confirm just how much data you’ll be encrypting. Select the desired button and click OK.
Now your file should be encrypted, as indicated by the padlock on your file’s icon. It’s safe to say that your file is a bit more secure now, but encryption isn’t an absolute guarantee, and you shouldn’t rely on it completely. For business purposes, we recommend something a bit more comprehensive.
If you need even more help protecting your business’s assets, don’t hesitate to reach out to Catalyst Technology Group at (317) 705-0333.
Tip of the Week: 11 Security Best Practices Every User Should Know

You might spend a significant amount of time thinking about your business’s security practices, but the same can’t be said for your organization’s employees. Unless you give them a reason to care about security, they likely won’t. The resulting apathy could eventually become serious problems that could hinder operations in the long run, or worse, expose your business to threats that could put your employees and your clients in danger.
In order to keep these instances to a minimum, consult the following cheat sheet. This will give your employees a great way to follow critical best practices.
Essential Cybersecurity Considerations
- Use the company’s network to store files: Always store your organization’s data on an in-house network. This is because any files stored locally on your desktop might not get backed up. Do not use personal cloud accounts, like Google Drive or Dropbox, to save or share company-owned documents.
- Never leave your workstation unlocked and unattended: Always lock your computer using the Windows Key + L shortcut before stepping away from it, even if only for a moment.
- Don’t connect unknown devices to your work PC: This is especially important for small devices like USB drives. You never know what could be on them.
- Don’t download or install applications without approval: If you download an app without permission from IT or a network administrator, you could cause problems for other employees. Always ask for permission before downloading or installing software.
- Don’t respond to unsolicited or suspicious emails: If you receive a message that has an unknown or unfamiliar sender, it could contain malicious ransomware or other nasty threats. Be sure to notify IT immediately so that they can investigate the issue. Be especially cautious around unsolicited proposals or resumes.
- Don’t accept support from unexpected callers: If you receive a phone call from someone claiming to be from Microsoft support (or other well-known companies), just hang up. These callers are often fraudsters hoping to remote into your PC and access company information.
- Adhere to password best practices: Keep your passwords strong and complex at all times, and never use the same password more than once.
- Get approval for mobile devices from your manager: Don’t use your smartphone, tablet, or laptop for work purposes until you’ve been granted approval. This is to keep company data as secure as possible.
- If you see someone, tell someone: If you think that something is out of the ordinary, like an intruder in the workplace, be sure to alert management. Visitors should not be allowed to roam around the office unattended.
- Think twice before clicking: If you’ve received a link in any correspondence, you should avoid clicking on it until you’re sure it’s from a trusted source. Links can often be considered cyber threats, especially those that are in spam messages.
- Report issues as soon as they appear: If you experience something that seems troublesome, report the issue to management immediately. Proactive vigilance is the best way to prevent downtime, and it only serves to make your job easier.
Print this list out and hand it off to any employees who could use training on security best practices.
Keeping the business secure isn’t just your responsibility–everyone should be involved in the process. By following this list of best practices, you stand to protect your business against threats that could harm operations. To learn more about how to secure your business, including external technology solutions that prevent issues from transforming into major problems, reach out to us at (317) 705-0333.
Tip of the Week: Did You Know Microsoft Word Calculates Math Equations?
You know Microsoft Word as a word processor that lets your organization compose documents. Yet, you may not know the extent to which you can use this application. You might be surprised to hear this, but you can even perform mathematical calculations using Microsoft Word!
First, you’ll need to open up a new document in Word. This will be your playground throughout the duration of this blog article, so feel free to try out this process as we walk you through it.
Look in the All Commands tree for the Calculate command. You can find it in File by navigating through Options.
The next step is to use the Quick Access Toolbar to find All Commands. You want to add the Calculate command to the Quick Access Toolbar for easy access.
Once this has been done, you’ll be able to solve an equation that you’ve typed out. All you have to do is highlight it with your cursor.
To put this new mechanic to the test, just type something basic like =4+4 into the document. Once you’ve highlighted the equation with your cursor, click the Calculate command that’s now located in your Quick Access Toolbar. You’ll now see the result of the calculation at the bottom of the screen in the left-hand corner, where you would normally see the number of words in the document.
That’s about as simple as it gets. This lets you stay in your Microsoft Word document without exiting just to go to your calculator application. In fact, many other apps that you have will also have hidden features that let you do more than meets the eye. For example, Microsoft Excel can also perform a variety of mathematical functions within its spreadsheets. All of this cross-functionality is one of the main reasons why a productivity suite like Microsoft Office 365 is so helpful for SMBs.
What other hidden tricks found in Microsoft Word can you think of? Let us know in the comments, and be sure to subscribe to our blog for more great tips.
Tip of the Week: Looking to Free Up Hard Drive Space? This Free Tool Can Help

No matter how much we wish it weren’t so, all PCs have limited amounts of storage space on them. This means that the user will eventually run out of space, and they will have to find a way to resolve this issue as soon as possible so as to avoid unsaved work. Plus, your performance will take a hit, so it’s best to look for a way to resolve this issue. Thankfully, a free tool like WinDirStat can help you free up space by identifying where all of your free space is being taken up, and how you can make some wiggle room with your PC’s largest files.
Before we dig into the details, we want to add a disclaimer about deleting any large files that might be on your company-provided computer. Users should always check with a company’s IT administrator before deleting anything large like this on their PC. By doing so, you could avoid accidentally deleting files and apps that are crucial to your organization.
The Windows Directory Statistics, or WinDirStat, is a tool that lets you see a visual “treemap” of how the space on your hard drive is being used. To download this free app, just go to the developer’s website: https://windirstat.net/download.html
When you first open up WinDirStat, the program will read your drive’s directory tree and show you three displays:
- Directory List: You’ll see what looks like a tree view of Windows Explorer, but it will be sorted by file type and subtree size.
- Treemap: You’ll be shown the entirety of the directory tree.
- Extension List: This shows statistics regarding file types.
Each of these files are represented by colored rectangles, and the size is proportionate to the file’s size. You will notice that these rectangles are arranged by directories and subdirectories. Therefore, the rectangles will be proportionate to the size of the subtrees. Additionally, the colors of the rectangles will indicate file type, and you can use the extension list to find the color that you’re looking for.
With this knowledge in mind, you’ll be able to make the best decisions possible regarding which files you want to delete to free up space for other uses However, you still need to be wary that deleting this files isn’t the only option at your disposal. Deleting large files that could hold value, like a video, simply because you don’t access it frequently, would be foolish. It’s ideal to simply get it removed from your drive through the use of an external drive, a network drive, or the cloud.
Granted, if your goal is to free up hard drive space and improve the way that your PC functions, you’re better off reaching out to professional technicians like those at Catalyst Technology Group. We can help your organization get the most out of its technology solutions, including your data storage procedures, reach out to us at (317) 705-0333.
Tip of the Week: How to Get Around YouTube’s Restrictions and Play Videos on Repeat

Anyone who has taken a stroll through YouTube knows that people love to upload music to the video sharing website. However, YouTube doesn’t inherently offer a built-in repeat function for playing videos, so if you want to watch a video multiple times, you’re out of the loop. Fortunately, there are numerous online services that allow you to repeat videos.
This repeat feature has practical business purposes as well. It’s perfect for when you want to loop your company video at a trade show booth, storefront, or lobby.
First, you want to find the YouTube video that you want to loop. Copy and paste its URL into a new tab, but don’t hit Enter just yet.
Next, delete the protocol that is at the beginning of the URL. This is the “https://” portion of the link. Now, type the word “repeat” into the URL right after the word “youtube.” Keep the rest of the link intact so that the website knows which video you want to be repeated. The end result should look something like this: youtuberepeat.com/watch/(random letters and numbers).
This will redirect you to a site called ListenOnRepeat.com, which will let you play any YouTube video on repeat. This website will even track how many times the video has started over, which can be a great way to see how long you can listen to the same thing over and over again.
One other way that you can do this is by using Infinite Looper, which can let you play YouTube videos on a loop. In particular, Infinite Looper lets you loop specific sections of the video. So, if you like a specific part of a video, you can just play that over… and over… and over again.
You can find this service on http://www.infinitelooper.com/
For more great tips and tricks, reach out to us at (317) 705-0333 and subscribe to our blog.